TL;DR:
- A siding inspection thoroughly evaluates vinyl, wood, and fiber cement for damage that threatens a home’s integrity. Chicago’s climate accelerates siding failures due to extreme temperature swings, humidity, and hail, requiring regular inspections. Visual and diagnostic methods detect issues early, preventing costly repairs by identifying hidden damage and moisture intrusion.
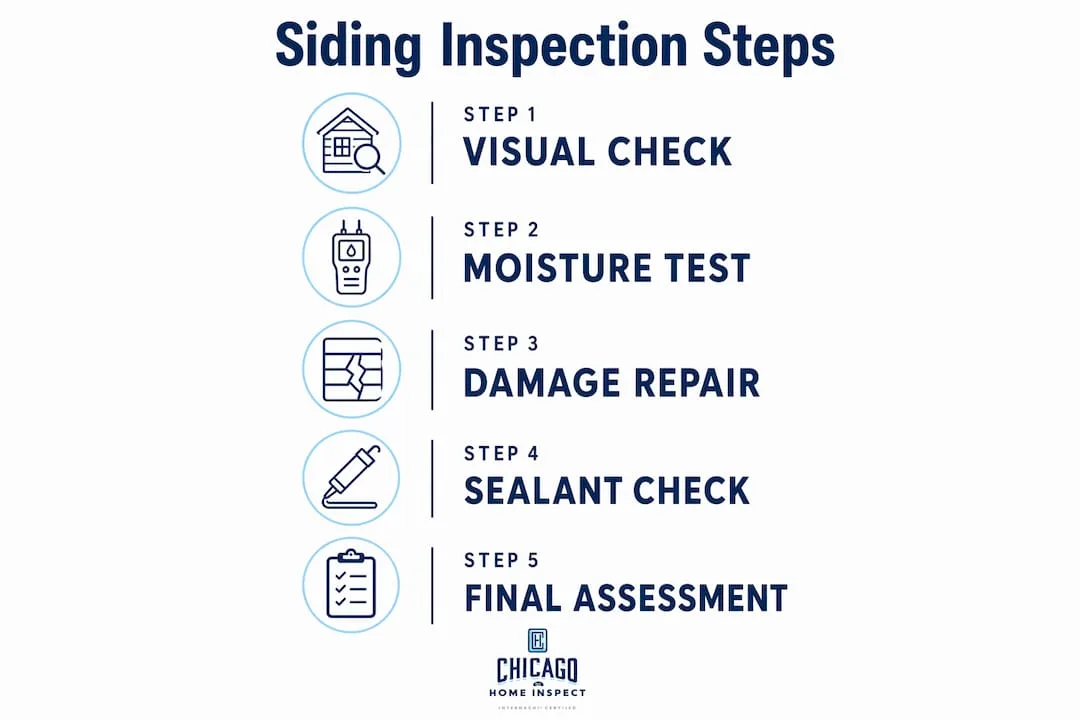
A siding inspection is a thorough evaluation of vinyl, wood, and fiber cement siding to detect failures that compromise a home’s protection and structural integrity. This siding inspection guide covers vinyl, wood, and fiber cement failures using proven diagnostic methods including moisture meters, trained visual assessment, and physical probing. For Chicago homeowners, the stakes are especially high. Our freeze-thaw cycles, humid summers, and punishing hail seasons accelerate every failure mode described here. Whether you own a bungalow on the Northwest Side, a two-flat in Logan Square, or a frame home in the suburbs of Lake County, your siding is the first line of defense against weather intrusion.
What are the common failure signs in vinyl siding?
Vinyl siding failure is driven by thermal stress and improper installation, causing warping, buckling, and cracking. That matters in Chicago because our temperature swings between january cold and july heat are among the most extreme in the country. Vinyl expands and contracts with every cycle. When panels are nailed too tightly during installation, they cannot move freely and they buckle outward.
Dark-colored vinyl absorbs significantly more heat than light colors. That extra heat load accelerates warping and can cause panels to pull away from the wall. On a south-facing wall in full summer sun, this effect is visible as a wave pattern running horizontally across the siding.
Key vinyl siding failure signs to look for:
- Warping or buckling panels: Check for a ripple or wave pattern, especially on south and west exposures.
- Cracking or brittleness: Cold months make vinyl brittle. Cracks often appear at corners or along panel edges after a hard freeze.
- Hail damage: Hail impact damage typically shows as vertical cracks along bottom edges and dents on corner posts and trim.
- Loose panels: Grab the bottom edge of a panel and gently pull. A properly installed panel resists movement. A loose one signals either failed locking or improper nailing.
- Fading and chalking: Severe UV fading is cosmetic, but it signals the panel is aging and becoming more brittle.
Pro Tip: Inspect vinyl siding in the morning or late afternoon. Midday sun flattens shadows and hides dents and cracks. Angled light reveals surface defects that direct overhead light completely misses.
Walk the full perimeter of the home. Pay extra attention to the bottom three feet of walls, corners, and any area near downspout discharge points. These are the highest-risk zones for both impact damage and moisture entry.
How to recognize wood siding deterioration and moisture damage
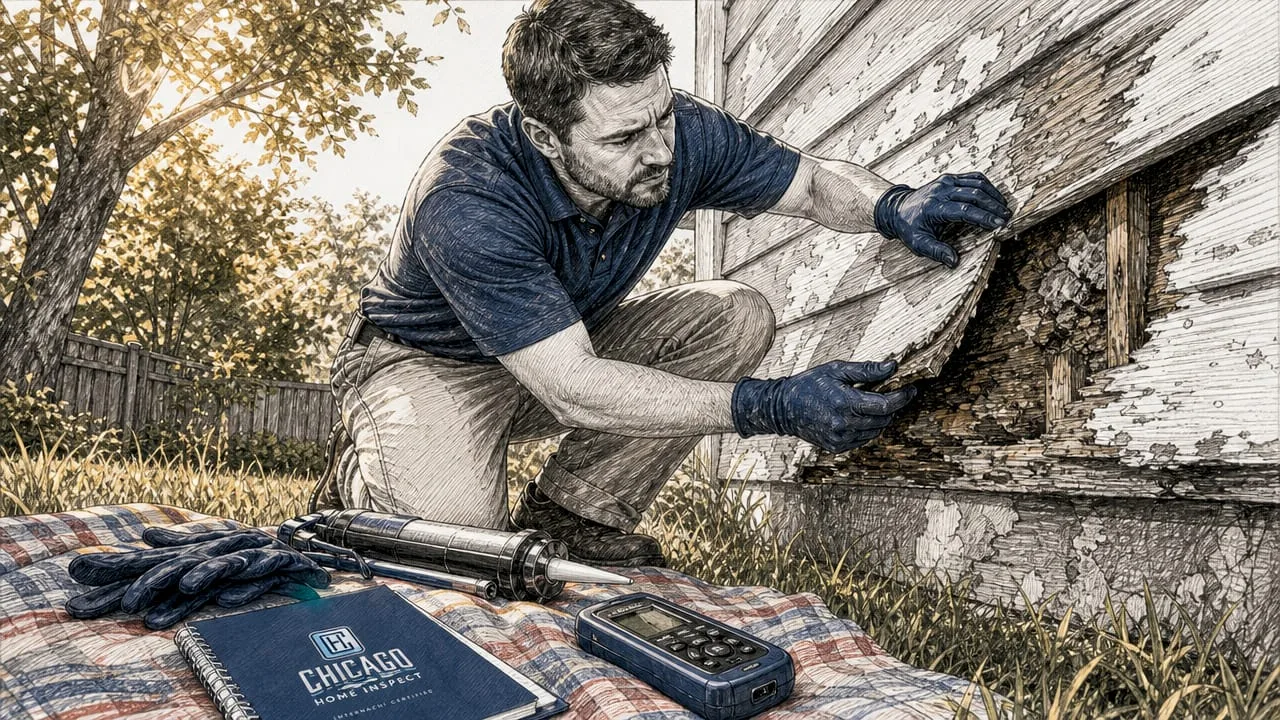
Moisture damage is the main agent of wood siding failure. Soft spots when pressed indicate rot that requires replacement rather than repair. Wood siding on Chicago homes, particularly older frame houses in neighborhoods like Portage Park or Elmwood Park, is especially vulnerable because many of these homes were built before modern moisture barriers existed.
A step-by-step approach to assessing wood siding:
- Start with a visual scan. Look for peeling or bubbling paint. Paint fails when moisture pushes through the wood from behind. This is an early warning sign, not a cosmetic problem.
- Check for dark staining. Black or gray streaks running vertically down boards indicate chronic moisture. Crumbled or soft edges confirm the staining is rot, not just dirt.
- Probe suspect areas. Use a screwdriver or probe tool and press firmly into any soft-looking board. Sound wood resists. Rotted wood compresses or crumbles. If it gives, replacement is the answer.
- Assess rot depth. Surface rot less than a quarter-inch deep can sometimes be patched with epoxy filler. Rot that penetrates deeper than that, or that recurs after patching, signals a systemic moisture problem requiring board replacement.
- Look for pest indicators. Ignoring minor rot invites wood-boring pests. Look for small round exit holes from beetles, or sawdust-like frass near the base of boards, which signals carpenter ants or termites.
Pro Tip: Recurring rot after a spot repair is a definitive sign that replacement is required. The rot is not the root problem. Failed flashing, blocked weep holes, or a missing drip edge is feeding moisture back into the same spot every season.
Caulk failures are a related red flag. Caulk is a secondary water barrier and will fail if the underlying flashing or drip edges are poorly installed. Recaulking over a failed flashing detail just delays the next rot cycle by one season.
What are typical fiber cement siding issues and how does inspection detect them?
Fiber cement siding, including products like James Hardie board, is marketed as low-maintenance and durable. That reputation is mostly earned. But fiber cement has its own failure modes, and they are easy to miss without a trained eye.
Common fiber cement siding issues:
- Chipping and cracking: Fiber cement is rigid and brittle. Impact from hail, ladders, or debris causes chips and cracks that expose the substrate to moisture.
- Moisture wicking: Despite its cement content, fiber cement absorbs water when it contacts soil or standing water. Panels installed within six inches of grade are at high risk.
- Efflorescence: White chalky residue on the surface is a sign of water moving through the material. It looks like a stain but signals active moisture migration.
- Soft spots under pressure: Pressing a panel that feels spongy indicates moisture trapped behind it, often from a failed paint film or a gap in the joint sealant.
- Surface discoloration: Streaking or uneven fading often points to paint film failure, which removes the primary moisture barrier on fiber cement.
| Failure type | Visual sign | Inspection method |
|---|---|---|
| Chipping or cracking | Visible breaks at edges or face | Visual scan at eye level |
| Moisture wicking | Dark staining near grade | Check bottom courses within 6 inches of soil |
| Efflorescence | White chalky deposits | Visual scan, especially on north walls |
| Soft spots | Panel flexes under hand pressure | Physical pressure test |
| Paint film failure | Fading, peeling, or bare substrate | Visual scan in angled light |
Pro Tip: Use angled morning or afternoon light when inspecting fiber cement. Raking light casts shadows across the surface and reveals chips, cracks, and surface irregularities that are invisible under flat midday sun.
What inspection methods reveal hidden siding damage and moisture intrusion?
Siding is a water-shedding layer but not fully waterproof. The weather-resistant barrier behind the siding is the true defense. That distinction matters because visible siding can look intact while moisture has already breached the barrier behind it.
Professional inspectors use several methods to find what the eye misses:
- Moisture meters: A calibrated moisture meter pressed against siding or trim gives a reading that confirms or rules out active moisture intrusion. Elevated readings near windows, doors, or corners point to specific failure locations.
- Infrared cameras: Thermal imaging detects temperature differences caused by wet insulation or wet framing behind siding. A cold wet spot shows up clearly on an infrared scan even when the surface looks dry.
- Physical probing: Pressing along the bottom three feet of walls and at corners is often more reliable than visual inspection alone. Sponginess under hand pressure confirms moisture damage that a camera might not catch.
- Transition and gap checks: Inspectors examine soffits, fascia, and door and window seals as moisture pathways. A gap at a J-channel or a failed window seal is often the entry point for water that appears as rot six feet away.
- Documentation: Every defect gets photographed with location notes. This record supports insurance claims and helps contractors prioritize repairs correctly.
Timing matters for inspections. Spring inspections catch freeze-thaw damage before summer humidity compounds it. Fall inspections identify vulnerabilities before winter. After a major hail event, a targeted inspection is worth scheduling regardless of season.
How do Chicago’s climate conditions affect siding failures?
Chicago’s Climate Zone 5 designation means our homes face some of the most demanding conditions in the country for exterior materials. Ice, moisture, and humidity cause significant freeze-thaw damage and moisture-related siding failures, especially for wood and fiber cement.
The seasonal inspection schedule that makes sense for Chicago homeowners:
- Early spring (march to april): Inspect after the last freeze. Look for cracks in vinyl from winter brittleness, paint failure on wood boards, and chipped fiber cement from ice and debris impact.
- After major storms: Chicago hail seasons peak in late spring and summer. Inspect vinyl corners, bottom edges, and trim within a week of any significant storm.
- Early fall (september to october): Check caulk and sealants before temperatures drop. Failed caulk that survives summer will allow water infiltration the moment freeze-thaw cycles begin.
- Pre-winter check: Confirm all downspouts direct water away from the foundation and that no siding sits within six inches of grade. Standing water at the base of a wall is a direct moisture threat to all three siding types.
Experts recommend at least two thorough siding inspections annually, ideally in early spring and early fall, plus after major storms. That schedule is not excessive for Chicago. It is the minimum that makes sense given our weather.
Older Chicago housing stock adds another layer of complexity. Graystones in Lincoln Park and brick bungalows on the Northwest Side often have original wood trim and soffits that have been covered with aluminum or vinyl over the decades. Hidden original wood beneath those layers can be rotting silently. A probe inspection at trim edges and soffits is the only way to know.
What we’ve learned inspecting siding across Chicago’s housing stock
After inspecting homes across Lake, McHenry, DuPage, and northern Cook Counties, we see the same pattern repeatedly. Homeowners treat siding damage as a cosmetic problem until water reaches the framing. By that point, a $400 repair has become a $4,000 project.
The most consistent mistake we see is patching visible rot without investigating why the rot is there. A failed drip edge above a window, a blocked weep hole, or a downspout discharging against the wall will rot the same board again within two seasons. Fixing the symptom without the cause is money spent twice.
We also see fiber cement installed too close to grade on newer suburban homes in Gurnee and Algonquin. The product is durable, but it is not immune to ground moisture. Panels within six inches of soil absorb water from below, and the paint film fails from the bottom up. By the time the discoloration is obvious, the substrate has been wet for years.
Our honest recommendation: walk your perimeter twice a year with a screwdriver and a critical eye. Press on boards. Look at caulk lines. Check the bottom of every wall. You do not need a moisture meter to catch most early failures. You need to look closely and know what you are looking for. When you find something soft, stained, or cracked, call a professional before the next freeze cycle.
— Chicago Home Inspect LLC
Schedule a siding inspection with Chicago Home Inspect LLC
Chicago Home Inspect LLC serves Lake, McHenry, DuPage, and northern Cook Counties with InterNACHI-certified residential inspections that include full exterior siding assessments for vinyl, wood, and fiber cement. Our reports include detailed photographic documentation of every defect, so you know exactly what needs attention and in what order. You can review exterior inspection findings and a sample inspection report on our website before you book. Weekends are available. We are licensed, insured, and BBB accredited. If you are buying a home or preparing for winter, a professional siding assessment is one of the most cost-effective steps you can take.
FAQ
What does a siding inspection check for?
A siding inspection checks for warping, cracking, rot, moisture intrusion, impact damage, and failed sealants across vinyl, wood, and fiber cement panels. Inspectors also examine transitions at corners, windows, doors, and soffits where water most commonly enters.
How often should Chicago homeowners inspect their siding?
Two thorough inspections per year are the recommended minimum, ideally in early spring and early fall, plus a targeted check after any significant hail or wind event.
Can fiber cement siding get moisture damage?
Yes. Fiber cement absorbs water when panels contact soil or when the paint film fails. Soft panels under pressure and white chalky efflorescence on the surface are the clearest signs of active moisture intrusion.
What is the difference between repairing and replacing wood siding?
Small surface cracks can be patched with epoxy filler. Recurring rot after a patch repair is a definitive sign that the board and the underlying moisture source both require attention, making replacement the correct choice.
Why does vinyl siding warp on some walls but not others?
South and west-facing walls receive the most direct sun exposure, which causes vinyl to expand beyond its designed range, especially in dark colors. Panels nailed too tightly during installation cannot expand freely, which forces them to buckle outward.