
TL;DR:
- Early signs of mortar failure in Chicago brick homes include white crusts, recessed joints, and diagonal cracks, indicating ongoing damage. Climate factors like freeze-thaw cycles and improper materials cause mortar deterioration, risking structural issues if not properly addressed. Proper tuckpointing involves thorough mortar removal, compatible materials, and meticulous joint finishing to ensure long-lasting repairs.
Most Chicago homeowners assume their brick walls are fine until a chunk of mortar falls off or water appears on an interior wall. The truth is, brick failures rarely start that dramatically. They start as a faint white crust near a window, a slightly recessed joint you can scratch with a fingernail, or a thin crack running diagonally past a lintel. By the time damage becomes obvious, you’re often looking at repairs that cost several times more than they would have if caught early. This guide walks you through exactly what to watch for, what causes it, and how to make smart decisions before your investment takes a hit.
Table of Contents
- Recognizing failing mortar red flags in Chicago brick homes
- Why mortar fails in Chicago: Climate, materials, and common mistakes
- Proper tuckpointing vs. shortcuts: What makes repairs last
- When failing mortar signals bigger building envelope problems
- Why most homeowners underestimate mortar red flags—and what really preserves value
- Take the next step to protect your Chicago brick home
- Frequently asked questions
Key Takeaways
| Point | Details |
|---|---|
| Early signs matter most | Crumbling, recessed, or cracked mortar signals urgent attention is needed before structural damage sets in. |
| Chicago weather is harsh | Freeze-thaw, wind, and rain make local brick and mortar especially vulnerable without proactive care. |
| Real repair beats shortcuts | Proper tuckpointing involves deep removal, careful prep, and compatible mortar type—not just cosmetic surface patching. |
| Wider issues can lurk | Persistent mortar problems often signal unresolved water entry, failing lintels, or flashing—not just bad mortar. |
| Inspection preserves value | Professional evaluation links mortar repair with broader home protection for safety and long-term investment. |
Recognizing failing mortar red flags in Chicago brick homes
To understand why early warning signs matter, it helps to know what they look like up close. Most homeowners focus on the bricks themselves, but the mortar joints are the real front line. Mortar is designed to be a sacrificial material, meaning it absorbs stress and moisture so the bricks don’t have to. When mortar starts failing, it sends visible signals well before any structural damage occurs.
The most common signs include:
- Crumbling or powdery mortar that you can scrape or press away with your finger
- Recessed joints where mortar has pulled back noticeably below the face of the brick
- Hairline or step cracks running diagonally through joints, especially near windows, door frames, or parapets
- Efflorescence, the chalky white residue left behind when water travels through the wall and evaporates, depositing salts on the surface
- Hollow or loose sections that produce a dull sound when tapped
- Missing mortar chunks in isolated spots, particularly on north-facing or lakefront-exposed walls
The common “failing mortar” red flags in Chicago brick facades include crumbling, powdery, or missing mortar in the joints, recessed mortar profiles, and continuous hairline or step cracking. These aren’t cosmetic issues waiting to become real problems. They are real problems already in progress.
Severity check: Once mortar is visibly recessed beyond its normal profile or can be removed easily with finger pressure, most professionals consider tuckpointing genuinely necessary, not optional.
Efflorescence deserves special attention because homeowners often dismiss it as staining. In reality, it confirms that water is moving through your wall. You can wipe it off, but if it keeps returning, water entry is ongoing. Check our inspection tips for older brick homes if your home was built before 1950, since earlier mortar compositions behave very differently and require extra care when evaluating damage.
The key takeaway here: step cracks and efflorescence are not cosmetic. They are diagnostic. Each one tells a story about where water is getting in, where stress is concentrating, and how urgently you need to act.
Why mortar fails in Chicago: Climate, materials, and common mistakes
Knowing how to identify failed mortar is only part of the picture. You also need to know what’s causing it to avoid repeated issues. Chicago’s climate is genuinely punishing for masonry, and the city’s older housing stock creates specific vulnerabilities that newer construction in other cities doesn’t share.
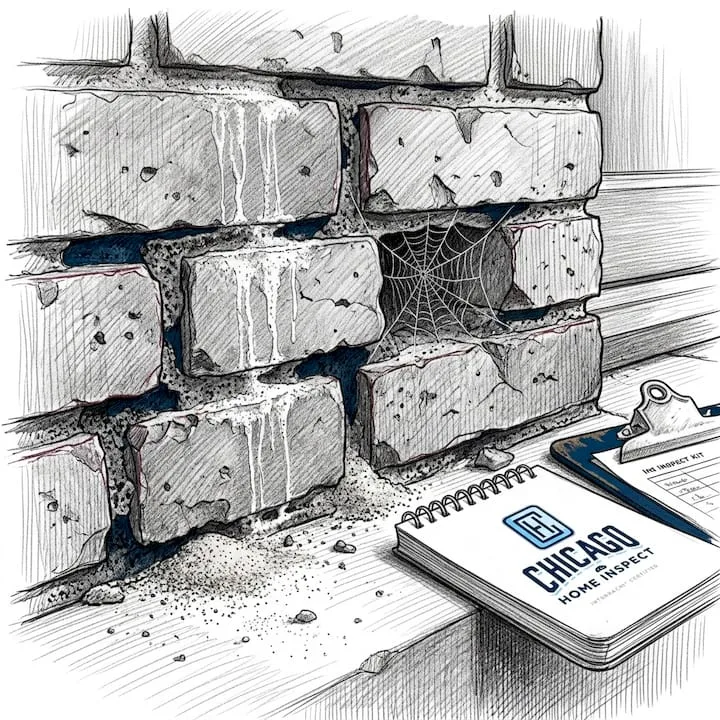
The freeze-thaw problem is the biggest culprit. Chicago regularly cycles above and below freezing dozens of times each winter. When water infiltrates a mortar joint and then freezes, it expands by roughly 9 percent. That expansion happens inside the joint, pushing outward against the brick and surrounding mortar. Over many cycles, even small amounts of trapped moisture carve out significant damage. Chicago’s freeze-thaw cycles combined with wind-driven rain and lakefront exposure increase the risk of water entry, expansion, and brick spalling where mortar joints fail.
Here’s how the most common causes and mistakes compare:
| Cause or mistake | Why it happens | Consequence |
|---|---|---|
| Freeze-thaw cycling | Water trapped in joints expands | Cracked and spalled mortar, eventually bricks |
| Lakefront wind-driven rain | Lateral water pressure against walls | Accelerated joint saturation |
| Incompatible mortar mix | Modern Portland cement too rigid for older brick | Brick face spalling, stress cracking |
| Surface patching (face pointing) | Contractor applies new mortar over failing joints | New layer detaches within 1 to 2 years |
| Neglected efflorescence | Active moisture ignored as cosmetic issue | Continued wall saturation and damage |
One mistake that shows up repeatedly in Chicago’s older neighborhoods is the use of high-Portland-cement mortar on historic soft brick. Modern mortar mixes are much harder than the brick used in pre-1950 Chicago construction. When mortar is stronger than the brick around it, stress doesn’t dissipate through the joint as intended. Instead, it transfers into the brick face, causing spalling, cracking, and permanent damage. This is a mistake that cannot be undone easily and can ruin historically significant facades.
The impact of Chicago weather on home exteriors goes well beyond what most homeowners expect, especially for masonry built more than 50 years ago.
Pro Tip: Run your hand along mortar joints at eye level on an older Chicago greystone or brick two-flat after a dry week. If you can press powder out with your thumb, those joints need professional attention before the next winter freeze cycle hits.
Proper tuckpointing vs. shortcuts: What makes repairs last
With these causes and warning signs in mind, let’s make sure your repair project truly solves the problem for the long run. The word “tuckpointing” gets used loosely, and that’s part of the problem. Real tuckpointing and surface patching are not the same thing, but they can look identical right after the work is done. The difference shows up clearly within the first two winters.
What proper tuckpointing actually involves:
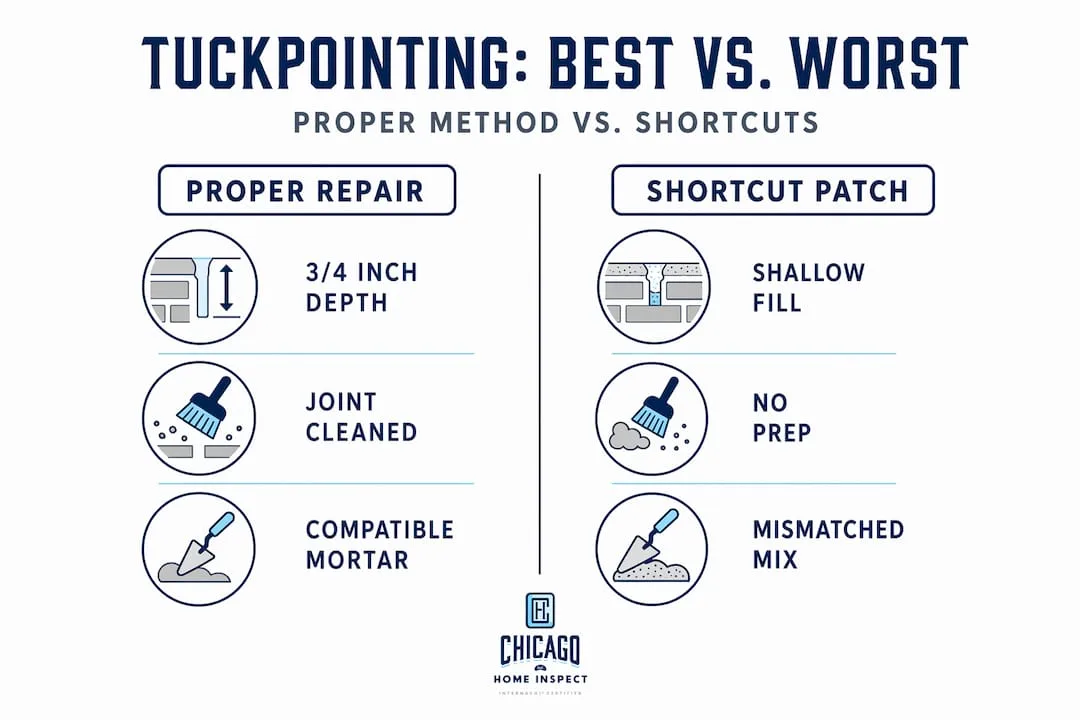
- Remove deteriorated mortar to a minimum depth of three-quarters of an inch, typically done with an angle grinder or oscillating tool, not just hand chisels
- Clean the joint thoroughly to remove all dust, debris, and loose particles
- Test or analyze the existing mortar composition and match the replacement mix in strength, flexibility, and color
- Apply the new mortar in layers, not all at once, allowing partial curing between applications
- Tool the joint to the correct profile (concave, flat, or struck) to match the original detail and encourage water runoff
- Allow proper curing time and protect fresh joints from rain or extreme heat for at least 72 hours
The quality of mortar joint repair depends entirely on correct grinding and extraction depth, joint cleaning, compatible mortar selection, proper profile, and correct curing. Surface smearing is not structural repointing, no matter how clean it looks on the day of application.
Here’s how proper tuckpointing compares to common shortcuts:
| Feature | Proper tuckpointing | Surface patching (face pointing) |
|---|---|---|
| Mortar removal depth | 3/4 inch minimum | None, applied over existing |
| Joint cleaning | Full dust and debris removal | Minimal or none |
| Material compatibility | Matched to original | Often generic Portland mix |
| Expected lifespan | 20 to 30 years | 1 to 3 years |
| Water resistance | High | Very low |
| Cost over 10 years | Lower (one proper repair) | Higher (repeated patches) |
Long-term performance depends on confirming grinding depth, prep, and compatible mortar installation before starting any masonry repair.
For historic home tuckpointing advice, the stakes are even higher. Greystone and early 20th-century brick construction require lime-based mortars with low compressive strength to preserve the original material.
Pro Tip: Before hiring a masonry contractor, ask them specifically what depth they grind to and whether they’ll do a small sample section for you to review before proceeding with the full scope. Any experienced, reputable contractor will say yes without hesitation.
When failing mortar signals bigger building envelope problems
Sometimes, even the best tuckpointing effort won’t last if the root problem isn’t addressed. This is where many homeowners spend money and still end up with the same issues a year or two later. The mortar joints fail again, the repair looks rough, and frustration sets in. What actually happened is that tuckpointing treated a symptom while the real cause continued unchecked.
Watch for these situations where mortar failure points to something deeper:
- Leaks that appear only after a thaw or rain event near windows or parapets often indicate failed or missing flashings rather than mortar failure alone
- Cracking that concentrates above window and door openings may signal a failing lintel, the horizontal metal or stone support that carries the brickwork above openings
- Staining or moisture on interior walls directly behind exterior masonry suggests water has bypassed the mortar joints through interface gaps or failed caulk at window perimeters
- Repetitive mortar deterioration in the same locations after fresh repair confirms water entry at a specific point that tuckpointing cannot seal
- Horizontal cracks at consistent heights across a facade may indicate wall tie failure or settlement issues, both of which require assessment beyond masonry work
The signs of lintel failure during freezing conditions are often mistaken for ordinary mortar damage. Flashings, lintels, and transitions between materials can drive leaks and recurring mortar failure, making tuckpointing alone an insufficient solution in those cases.
Important: If mortar deterioration keeps coming back after professional repair, stop spending money on patching and get a full building envelope evaluation. The problem is upstream of the joints themselves.
Evaluating these issues properly requires looking at the whole picture, not just the visible masonry surface. Check our resources on identifying foundation issues and the most overlooked exterior defects found during Chicago home inspections. These two areas together account for a large share of the recurring masonry failures we see during inspections in neighborhoods across Chicago and the suburbs.
Pro Tip: After any significant rainfall, walk your exterior perimeter and look for water staining below window sills, at parapet caps, and where different materials meet. These are the spots where flashing and interface failures announce themselves first.
Why most homeowners underestimate mortar red flags—and what really preserves value
Here’s a perspective that doesn’t get said enough: homeowners in Chicago routinely treat tuckpointing as a cosmetic project because it looks like one from the street. The fresh mortar makes the house look neat. The old, grayish, recessed joints look shabby. So the mental model is “it’s an appearance issue.”
That framing is expensive. Mortar is not decorative grout. It functions as the moisture management layer for your entire brick wall. When tuckpointing is done right, it protects bricks from taking on water directly. Repeated recurrence after “repair” points to wrong prep, incompatible materials, or unresolved leaks. Think of it as the caulking around a bathtub, except the consequences of failure are measured in structural damage and five-figure repair bills rather than a wet floor.
The second mistake we see constantly is homeowners prioritizing the cheapest bid. A face-pointing job costs less upfront and looks identical to proper tuckpointing for about six months. Then Chicago’s first hard winter arrives and the new mortar delaminates and falls away in sheets. Now you’ve paid once for a repair that didn’t work, and you still need to pay for a real one.
The most value-preserving approach treats tuckpointing as infrastructure maintenance, the same category as your roof or HVAC. It’s not exciting. It doesn’t change how your home looks dramatically. But getting it done correctly, with compatible materials and verified prep, extends the life of your masonry by decades. From a resale perspective, buyers today are savvier and their inspectors look closely at brick condition. A well-maintained exterior with documented masonry care is a genuine asset.
Understanding what good mortar maintenance looks like, including recognizing moisture entry before it becomes interior damage, is the difference between managing your home and reacting to it.
Take the next step to protect your Chicago brick home
Now that you know what to watch for, a professional home inspection gives you an objective, documented picture of where your masonry actually stands. Our team at Chicago Home Inspection Services is InterNACHI Certified, BBB Accredited, and available on weekends to fit your schedule. We inspect the full building envelope, not just the mortar joints, so you understand whether you need tuckpointing, flashing repairs, lintel assessment, or all three before spending a dollar on contractors.
Browse our exterior home inspection photos to see exactly what we document, and review a sample inspection report to understand the detail you’ll receive. When you’re ready to protect your investment, schedule a home inspection online in minutes. We serve Chicago and the surrounding suburbs, including pre-listing, pre-purchase, mold testing, radon testing, and yearly home checkup services.
Frequently asked questions
How can I tell if mortar damage is urgent versus cosmetic?
If mortar is cracked, recessed, or flakes away with light pressure, most professionals consider it urgent and recommend tuckpointing before further freeze-thaw damage occurs.
Does mortar color or type matter for Chicago brick homes?
Yes. Mortar must match the original in color, strength, and composition because using incompatible mortar that is too hard can cause brick face spalling and accelerated deterioration of the wall system.
How do I avoid contractor shortcuts or tuckpointing scams?
Ask about mortar removal depth, joint cleaning method, and material compatibility, and request a sample repair section before authorizing full-scope work.
What if mortar keeps failing even after repairs?
Recurring failure almost always means other envelope components, such as flashings, lintels, or foundation movement, are driving the problem and have not been identified or corrected.